Replacing a Serpentine Belt Tensioner Assembly on a 2004 Toyota Camry
Author: John Published Under: Automobiles
 Recently, a friend asked me to help replace the alternator on his wife's 2004 Toyota Camry. This is the 2.4L 4 Cylinder Model.
While driving, she heard a loud noise, which turned out to be the serpentine belt being thrown from the alternator pulley, which had gone bad.
Since an Alternator is a quick job, usually less than 30 minutes, I hopped in the truck, grabbed my basic tool kit, and headed over to pick him up.
However, after replacing the alternator and going to put on the serpentine belt, I noticed that someone had broken off the tension release nut.
To be fair, we had noticed this before beginning work, but had hoped to be able to come up with a solution for getting the belt on.
The tension release bolt is a 19mm nut that is on the top of the tensioner pulley assembly. By pushing down on the nut, the tension pulley moves down, allowing the serpentine belt to be removed or installed.
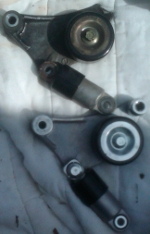
As you can see from the picture on the left, his tensioner drive belt assembly was broken and there was no way to safely and easily release tension on the pulley.
Click Image For Full Size!
How-To Article Contents
- More Reading
- Types of Toyota Camry Tensioner Assembly's
- Removing the Serpentine Automatic Belt Tensioner Assembly
- Installing the Serpentine Belt
More Reading
 You can check out Toyota's 2AZ-FE Engine Mechanical document for more details.
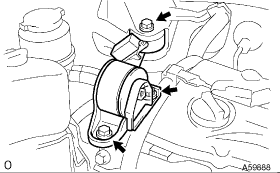
The diagram on the right shows the tensioner assembly, including the top bolt and bottom nut that must be removed. These are secured to the egine and the only tricky one is the top bolt, which can not be removed without lifting the engine slightly.
Types of Toyota Camry Tensioner Assembly's
This is the Hydraulic tensioner assembly, but there is also a spring model. They should be interchangeable though.
Removing the Serpentine Automatic Belt Tensioner Assembly
 The steps are described in more detail below, but the tensioner is held in place by a 14mm bolt and a 14mm nut.
The top bolt on the tension pulley can be unscrewed by removing the top engine mount and removing the nut from the top of the bottom passenger engine mount.
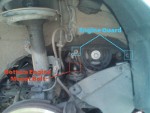
The image on the left shows the engine guard and bottom engine mount bolt, which can be accessed by removing the passenger side tire.
Then, by carefully jacking up the engine slightly, it is possible to put a ratchet on the top bolt on the tensioner, removing it.
How to remove a 2004 Toyota Camry Drive Belt Tensioner:
- Remove Negative lead from battery.
- If the serpentine belt is still attached, remove it. If the tensioner is broken, it may be necessary to remove the middle bolt[1] in the tensioner and or cut[2] off the serpentine belt, depending on its quality.
- Place blocks behind the rear driver side wheel and loosen the lug-nuts on the front passenger tire
- Carefully jack the passenger front side of the car up, placing a jackstand under it.
- Remove the front passenger tire.
- Remove the two bolts holding the engine side splash guard in place. There are actually three+, but removing two allows the guard to be moved out of the way.
- Place a block of wood[3] on a jack and place it under the engine oil pan, applying only enough pressure so that the block does not move.

- Remove the AC line bracket and top engine mount, which is held with three bolts. Two on the engine, one on the vehicle frame See picture at right
- Remove the nut on the top of the bottom engine mount, using a 19mm socket.
- Remove the bottom nut holding the tensioner in place.
- Carefully jack the engine up, being careful not to damage the engine pan. Jack it ONLY enough so that a 14mm 6-point[4] socket can be placed on the top tensioner bolt.
- Carefully remove the top tensioner bolt, using a break bar if necessary.[5]
- The Tensioner should easily come off.
Installation is the reverse of above. When lowering the engine, make sure the motor mount slides onto the exposed bolt.
It may be necessary to carefully use a pry bar, only slightly, to correctly position the engine onto the motor mount.
[1] The middle bolt is a pivot bolt and does not connect to the engine. Removing it allows the tensioner assembly to be freely moved.
[2] Belts cost over $20, so unless it is overly worn or damaged, cutting it should be a last resort.
[3] Use a small section of 2 by [4] You should use a six-point socket, in order to prevent the bolt head from being rounded. [5] This bolt can only be removed when the engine is slightly raised, be careful not to break the bolt head off when using a breaker bar. It is important, however, to make sure it is installed correctly on the pulleys. There is only one way it can go on, if you spend a bit of time thinking about it, you should be able to figure it out. However, the serpentine belt diagram on the right shows the correct installation on a 2004 Toyota Camry with a 2.4L 4 Cylinder Engine. By pushing down on the tension release bolt, which is 19mm, it is possible to relieve tension on the pulley, allowing the serpentine belt to be slid on. Joe, yes, if you are trying to replace the serpentine tensioner assembly on a Camry, then there are two bolts that you need to remove. You can see these in the red boxes in the above diagram. Otherwise, if you are just replacing the belt, you can use the 19mm bolt that is welded on to relieve the tension on the belt and should not have to remove any bolts. Unfortunately for us, someone had broken welded bolt head off on this Toyota, so we had to replace the whole tensioner assembly in order to get the belt back on. That is what is in the first image at the very top, the bolt head is missing on the dirty tensioner.Installing the Serpentine Belt
 Installing a serpentine belt on a 2004 Toyota Camry, assuming the tensioner is not broken, is fairly straightforward.
 Comments
Add Comment