Cleaning the MAF Sensor and Replacing O2 Sensor on Mazda B4000
Author: John Published Under: Automobiles
I have 1998 Mazda B4000, which is essentially a Ford Ranger XLT, just with Mazda branding and a few other changes. Overall, I have been pretty happy with this vehicle and it has definitely been used as a work truck.
The B4000 is the 4.0 Liter V6 Model, which has a German built engine in it.
Recently, the check engine light came on and after bringing it to Advanced Auto, I found it had the following warning codes: P0153, P0171, P0174.
These error codes are part of the On-board diagnostics II(OBD-II) system in the vehicle.
This How-To Guide Covers a few topics, which are listed below:
- Error Codes Descriptions
- Bank 1 vs Bank 2 Oxygen Sensors
- Resetting the Check Engine Light
- Showing a Ready State
- Inspecting and Cleaning the Mass Air Flow Sensor(MAF)
- Checking for Vacuum Leaks
- Removing and Replacing the Oxygen Sensor
- Final Checks
Error Codes Descriptions:
P0174 - Lean Air to Fuel Ratio on Bank 2*, which can be caused by a vacuum leak, broken and/or dirty Mass Air Flow(MAF Sensor), or other mechanical problem.
P0171 - Lean Air to Fuel Ratio on Bank 1*, which can be caused by a dirty or broken MAF Sensor, vacuum leak, low fuel pressure, or other mechanical issue.
P0153 - Heated Oxygen Sensor(O2 Sensor) circuit malfunction, which can be the reuslt of a bad O2 Sensor or very lean/rich air to fuel ratio.
Bank 1 vs Bank 2 Oxygen Sensors
*Bank 1 refers to the Oxygen Sensor on the same side of the engine as the #1 Cylinder. In the case of a Mazda B4000, or similar Ford Ranger, this is on the right hand Passanger Side.
Bank 2 would be the opposite side of the #1 Sensor.
You can consult your manual to determine what side the #1 cylinder is, which will have a diagram for the vehicle.
Resetting the Check Engine Light
Since, especially with O2/Air Flow Issues, sometimes the issue is temporary and can be resolved by resetting the check engine light, it is a good idea to try this first.
If you have a tool to check the OBD-II error codes, you can use this. Otherwise, some autoparts stores will clear the codes for you, although it is Auto-Zone's policy NOT to reset the check engine light for customers.
Removing the negative battery lead for at least five minutes should reset the computer too, which ends up being easiest most of the time, although this may reset the Radio Presets.
Showing a Ready State
Before you can pass inspection, or see if the engine light will come back on, you need to run the engine for awhile to reset the ready code. Until the ready code has been set, which just means the engine has been able to set all its sensors, you will not be able to pass inspection or see any check engine lights.
Driving around for awhile is the only way to set the ready state, most places will tell you to drive it around for 50 miles, but in my experience it rarely actually takes that long.
Driving stop and go, highway, and basically how you would normally drive it, will reset the code.
Inspecting and Cleaning the Mass Air Flow Sensor(MAF)
 Since Mass Air Flow Sensors can be really expensive, between $100 and $300, depending on where you go and whether you get a new or refurbished one, it is a good idea to remove and clean it first.
Often, with the above error codes, a simple $8 bottom of MAF Sensor Cleaner will do the job. These are available at the auto-parts store, CRC Mass Air Flow Sensor Cleaner does a good job.
IMPORTANT: Only use MAF Sensor Cleaner and do NOT use Brake or Carburetor Cleaner. The heavy duty petroleum based cleaners can damage the Mass Air Flow Sensor
The Mass Air Flow Sensor has several small platinum wires, which can easily be damaged, so it is important to never actually touch these wires. Instead, spray them from all sides and inspect for broken wires or dirt on the wire.
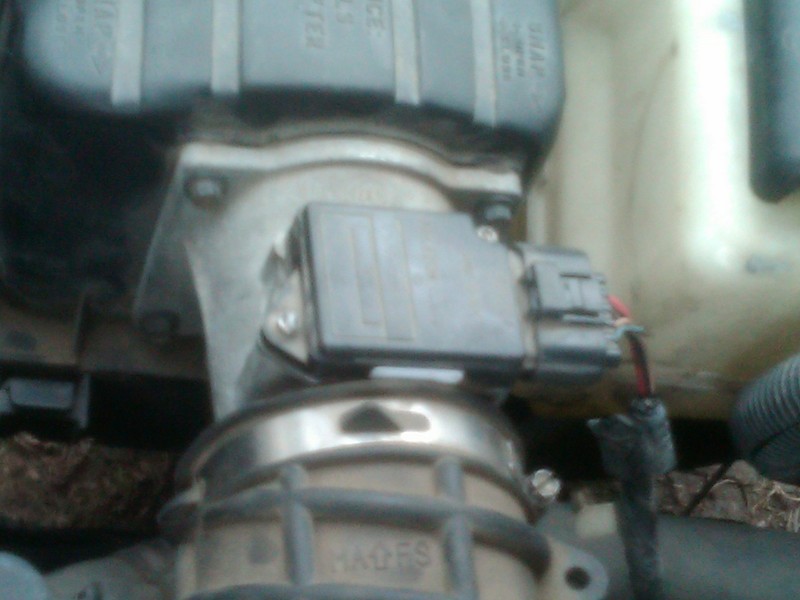
On a Mazda Truck or Ford Ranger, the MAF Sensor is located next to the air filter on the front passenger side of the engine compartment. It is secured to the air filter box with four bolts and there are two security-hex bolts securing the MAF Sensor to its aluminum housing.
Removing the MAF Sensor
- Disconnect the negative battery terminal
- Remove the plastic electric plug carefully from the MAF Sensor, so as not to break the plastic clips
- If possible, remove the two Hex Security Screws that are in the top of the MAF Sensor, these require a special Security Hex Bolt.
- On mine, there was a bit of plastic in one of the security screws, to prevent removal, so this would need to be removed first.
- Carefully lift the MAF Sensor out of its aluminum housing. Make sure not to touch or damage the small wires in the end of the MAF Sensor
- You can also remove the entire aluminum MAF Sensor and Housing, by removing the four bolts that are connected to the air-filter housing.
Once the MAF Sensor is removed, carefully inspect it and spray it with the MAF Sensor Cleaner. Let it fully dry before reassembly and make sure to follow the instructions on the spray cleaner bottle.
Checking for Vacuum Leaks
It is also a good idea to check for vacuum leaks, which can cause the check engine light to come on. Carefully check along the entire intake system for any cracked tubes, loose connections, or other places where air might be getting in.
If air gets into the system past the MAF Sensor, it can cause error codes that deal with the Air/Fuel Ratio.
Removing and Replacing the Oxygen Sensor
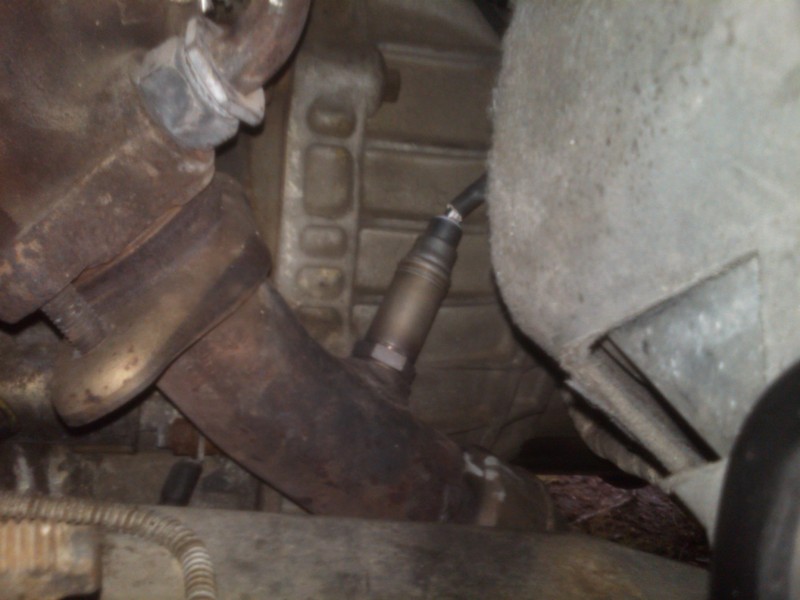
 After cleaning the MAF Sensor in my Mazda B4000, I rechecked the error codes and the only one still showing was one that dealt with the Oxygen Sensor. There is a picture of the location of the Bank 2 Oxygen Sensor at the top of this post.
The ODB-II Error codes indicated Bank 2 O2 Sensor was bad, which made sense because I had replaced the other O2 sensor the year before.
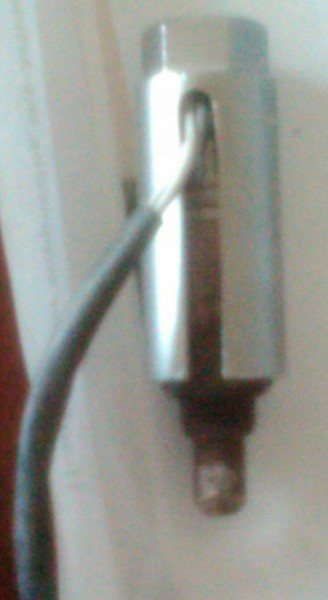
Removing and replacing an Oxygen Sensor is relatively easy, but you will probably need a special tool. Mine is pictured to the right, however, there are a few different types of Oxygen Sensor Removal Tools available.
The slit on the side of this type of O2 Sensor Removal Tool allows the cord to fit in the slot, so the socket can slide onto the Oxygen Sensor. You have to be a little careful with this type, because the cord gets bent down, so you want to ensure it does not get damaged when installing it.
Removing the Oxygen Sensor is fairly straightforward, but you want to make sure you identify the correct oxygen sensor to remove. Cars and Trucks typically have at least two and they are identified in relation to the #1 Cylinder of the engine. See above for more info about Bank 1 vs Bank 2 O2 Sensors
Removing the O2 Sensor
- Disconnect the negative battery terminal
- Locate the Oxygen Sensor. Depending on the model of Vehicle, there is usually at least one on both sides of the engine near the exhaust manifold.
- Carefully remove the electric plug, taking care not to break the connectors. These can often be very brittle and in cramped space, these types of plastic connectors break easily.
- Slide the O2 Removal Tool onto the Oxygen Sensor, carefully positioning the wire.
- Use a socket wrench or break bar to carefully loosen the Oxygen Sensor
- Remove and Inspect the Oxygen Sensor
Inspect the Oxygen Sensor for damage and ensure that the plastic connectors and wires running to the engine are in good condition.
Installing the oxygen sensor is the reverse of the above. If the new oxygen sensor does not have any anti-lock grease on it, you may want to apply a little to the threads before installing the new oxygen sensor.
Final Checks
As with any change, after installing the new O2 Sensor, you will need to get the engine to a ready state before it can be inspected. Drive the vehicle around some, trying to simulate regular city/highway driving.
In this case, after replacing the Oxygen Sensor and resetting the Check Engine Light, all codes went away.